
How to Apply a Discount to an Invoice
How to Apply a Discount to an Invoice A good discount is what your customer…

Invoices are one of the key documents of any business activity. To get compensated on time, mastering the filling of such papers is your priority. You’ll find out how to create an invoice with Excel on different devices and use ready-made templates from this article.
Excel is a handy spreadsheet tool. It works across many major platforms and allows you to personalize content to suit your requirements. If you don’t know how to do invoices on a computer with Windows OS, here is a quick guide with basic steps.
Run the program
To start creating a paper, launch Excel on your PC. Filling out a form will be faster if you have all the records about clients and the goods rendered at hand.
Find a template
First, users are prompted to pick one of the templates. To see the entire list, click the right arrow. Type the word “invoice” in the search bar, and the software will offer you all available options.
Choose a form
Using Excel to generate invoices is the best option, as it offers you lots of forms to choose from: a basic invoice, hourly bill for services, pro forma, shipping, and many others. Preview them and select the one that suits you.
Customize the form
Open the option you like and start customizing it. Since all the required fields are already there, you only need to enter the info:Save the paper
Now you know how to fill out an invoice. Review all data for errors or typos, and if everything is fine, save the file. Choose a format of invoices in Excel: .pdf or .xls. The first one is convenient for submitting to customers because it’s impossible to modify it. The second one is suitable if you still plan to put some info in the form.
The finished doc can be forwarded to orderers electronically, for example, via email, or printed and handed over personally.The process of creating invoices from Excel spreadsheets on Mac is not much different from working with the Windows version. Here is what to do to generate invoice:
Launch Excel
Find and launch the software on your device. An empty table does not open right away; To get started, you’ll be prompted to pick a suitable template.
Find a template
To make things easier for yourself, don’t look for the form manually. Instead, turn to the search bar to filter out inappropriate templates. Enter “invoice” and explore the options.
Select a form
In the library, choose an invoice template for Excel Mac that fits your activity the most. Both simple forms with a minimum of the required data and more detailed ones that take into account various nuances are available here.
Personalize the template
When you open the file, you’ll see empty blocks ready to be filled in. Here is how to set up Excel templates:
Save the file
Save the finished document in .xls format if you still plan to revise it and make changes. When the file is ready to be sent, convert it to invoice template PDF so that the recipient cannot edit its contents. Now that you know how to make an invoice in Excel on Mac, you can easily make expert bills and submit them to customers in any convenient way.

Although templates are considered the best option because they make it easier to issue docs and minimize the possibility of errors, you can form a bill from scratch. Here is how to do an invoice on Excel on your own:
Create a new workbook
Run the program on any computer or laptop and pick the first of the proposed objects, a blank workbook. You’ll get an empty spreadsheet. Start filling it out.
Compile a header
A summary of the basic information about the document and the company that issued it should be at your form’s top. Include the business name, logo (if any), date when the bill was made, and create invoice number. Please note that the title should contain the term “invoice.”
Enter orderer data
Details about the client for whom you completed the order should be the following: personal or company name, email, exact shipping address, and phone number for communication.
Specify the deadline
Put the exact date by which you expect money to be received or use the business term “Net…” to indicate the number of days to provide compensation. For example, “Net 30” means that they have 30 days from the issue date.
Describe the items offered
The main part of any bill is a detailed list of services and goods that you provided as part of an order, as well as their quantity, prices, and subtotal. Using Excel for invoicing is convenient because you don’t have to estimate the amounts manually; you can apply formulas. For example, type in the cell where the subtotal should be “=SUM(D5:D15)” to sum up all the scores in rows 5 to 15 from column D.
Estimate the total sum
Add taxes, fees, and shipping costs to the subtotal and subtract discounts (if you give them) to get the total amount payable. Here you can also use the previous formula.
Enter payment terms
Indicate the payment methods available, the fees that will follow in case of a delay in compensation, and other policy details that customers need to pay attention to.
Review the text for errors and inaccuracies, save it to your device, and submit it to a client. Now you understand how to make your own invoice in Excel in five steps.

If you do not know how to make a billing statement in Excel or do not want to spend a lot of time on it, the easiest and most convenient option is to get the ready-made Excel invoice template, which you can find in our catalog. Download the file to your PC and start filling it out.
Click on the bottom to create an invoice in Excel fast.
Provide the following data:
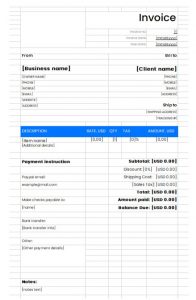
Follow these steps to make your Excel invoice template and get paid faster
Here is the filled template:
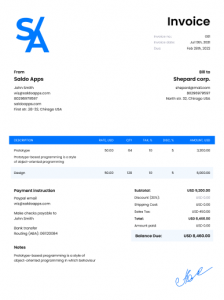
You’ve submitted an order, and it’s time to get your money. Here is how to organize the invoicing system in Excel:


How to Apply a Discount to an Invoice A good discount is what your customer…

How to Add Taxable and Non-Taxable Items on One Invoice Invoicing is never as straightforward…
3 Reasons to Use Paperless Invoices It is 2024 out there, and machines have already…